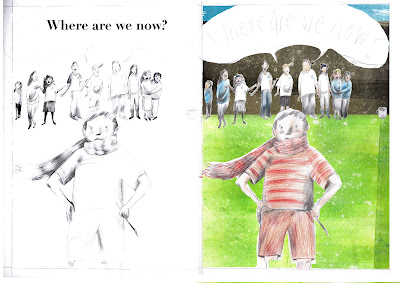
Before and After:
The one on the left was my original rough. The one on the right I coloured, rescanned and erased the white background with my textures as a layer underneath - thus creating a finished page! Sort of ... this is only a test version I did - the edges are obviously not aligned in this one so will probs need to redo the backgrounds. But this is generally what it will look like:

Trying to think of a better tool to use than just the eraser tool... Working on it atm and will be posting the work in progress on my blog. Any ideas would be appreciated!
thanks.
kt.
hi katie! kno just how you feel about digital editing = v annoying! what i tend to use other than the eraser to remove areas is the magnetic lasso tool or quick selection tool, then just hit delete (providing you're in the right layer.) that seems easier for me, unless you're using the eraser tool for something else?
ReplyDeleteor, you could use the magnetic lasso to select your people, then copy them onto the collaged background, then you wont have to do any erasing of any white area :o)
i really like your rough version, i like the b&w element more so than the colour, but thats just preference, i like the rawness with the b&w one.
i think also the colour one would be a lot better like you have said with the hand collage, i think it would just blend nicer :o)
Ktc and vicki and anyone else planning to do more digital work - we should get together and set about working out ways of making life easier - at the moment I am working with color range, channels and loading selections for silk screen - for selecting specific areas there are tons of ways to do it, and it will be a case of personal preference along with most suitable tool for the job - to get rid of all white, most people just use multiply on the layer, but until you show us exactly what you are trying to do, I will wait before giving advice
ReplyDeletemore - multiply would be no good in your example - I would make another layer and use a wacom tablet to draw a fine "closed outline" around your figures and then select everything with the magic tool outside those outlines, switch back to my layer (which is probably the background image) with the image, and then delete the white - you can now get rid of the closed outline layer - if you want to do this very accurately, I would use the:
ReplyDeletehttp://www.wacom-shop.net/cgi-bin/wacom.storefront/49e7ad6d00f639b6273f4ddcef2606e8/Product/View/DTZ&2D2100D
that we have in the open access computer area opposite 138!
that sounds really complicated!! but im sure its not ;o)
ReplyDeletei love these examples- the rough collage-y effect has worked we ll i reckon.
ReplyDeletei dont know if it would give you the same results as me because my works in pencil but i put the original scan on linear burn- this makes the layer almost transluscent, then drop the colour layers beneath it so they show up but all the dark lines are on top. if u wanted to highlight areas of light you could just use the eraser on the colour layer. i think this would take less time then having to go round everything. hope this works- if it doesnt then never listen to me again.
clever to use linear burn, same as multiply - but rubbing out on the inside or drawing a thin closed line are actually the same - though I would bet with the cintiq either would be superfast - just got to know which tools to use when Another option is to just close the open lines on the figures - again, I guess I have to show you to make myself clearer.
ReplyDeletei have no idea what youre both talking about. and i thought i was good on photoshop! think i need a few workshops....
ReplyDeletewow that is complicated! linear burn would be good to use on a different colouring project but with this one I don't want to use too much digital manipulation. I'm already having trouble maintaining the characteristics of my pencil drawings... (although milan yours look great as usual!)
ReplyDeleteI made a double spread which I will post later. I used the eraser tool and the magnetic lasso tool - it looks a little neater but I am still not quite comfortable with way they sit on the page.
(BUT I did find a way of changing the colours from pukening green to whatever I want :D)
kt.